Rank: Newbie
Groups: Registered
Joined: 3/20/2026(UTC) Posts: 2  Location: Wilmington
|
Hi everyone,I want to introduce VRC (Video Recording Control Hub) — a centralized desktop application designed to manage, monitor, and automate distributed vMix workflows across multiple nodes. The core value of VRC is providing a unified dashboard with real-time telemetry and deep API control, allowing engineering teams to oversee their entire broadcast infrastructure from a single screen. Key Capabilities:
- Unified Telemetry: Real-time tracking of core vMix states (Recording, Streaming, External, Multicorder, Fullscreen), active Program/Preview sources, and dual-channel audio meters across all connected machines simultaneously.
- WMI Hardware Monitoring: Native tracking of remote CPU, GPU, and Storage (NVMe/HDD) health, including proactive alerts for low disk space.
- Instant API Control: Direct remote access to audio routing (Bus A-G), input switching, and external outputs without relying on remote desktop sessions.
- Hardware-Agnostic Shortcuts: A "Thin Client" Stream Deck integration that ties buttons to VRC profiles, not physical hardware IDs.
Below is a detailed breakdown of the interface and feature set. [hr] VRC — Feature ReferenceQuote:User guide for VRC (Video Recording Control Hub) application features. [hr] 1. DashboardThe main screen of the application — a grid of connected device cards with real-time monitoring. 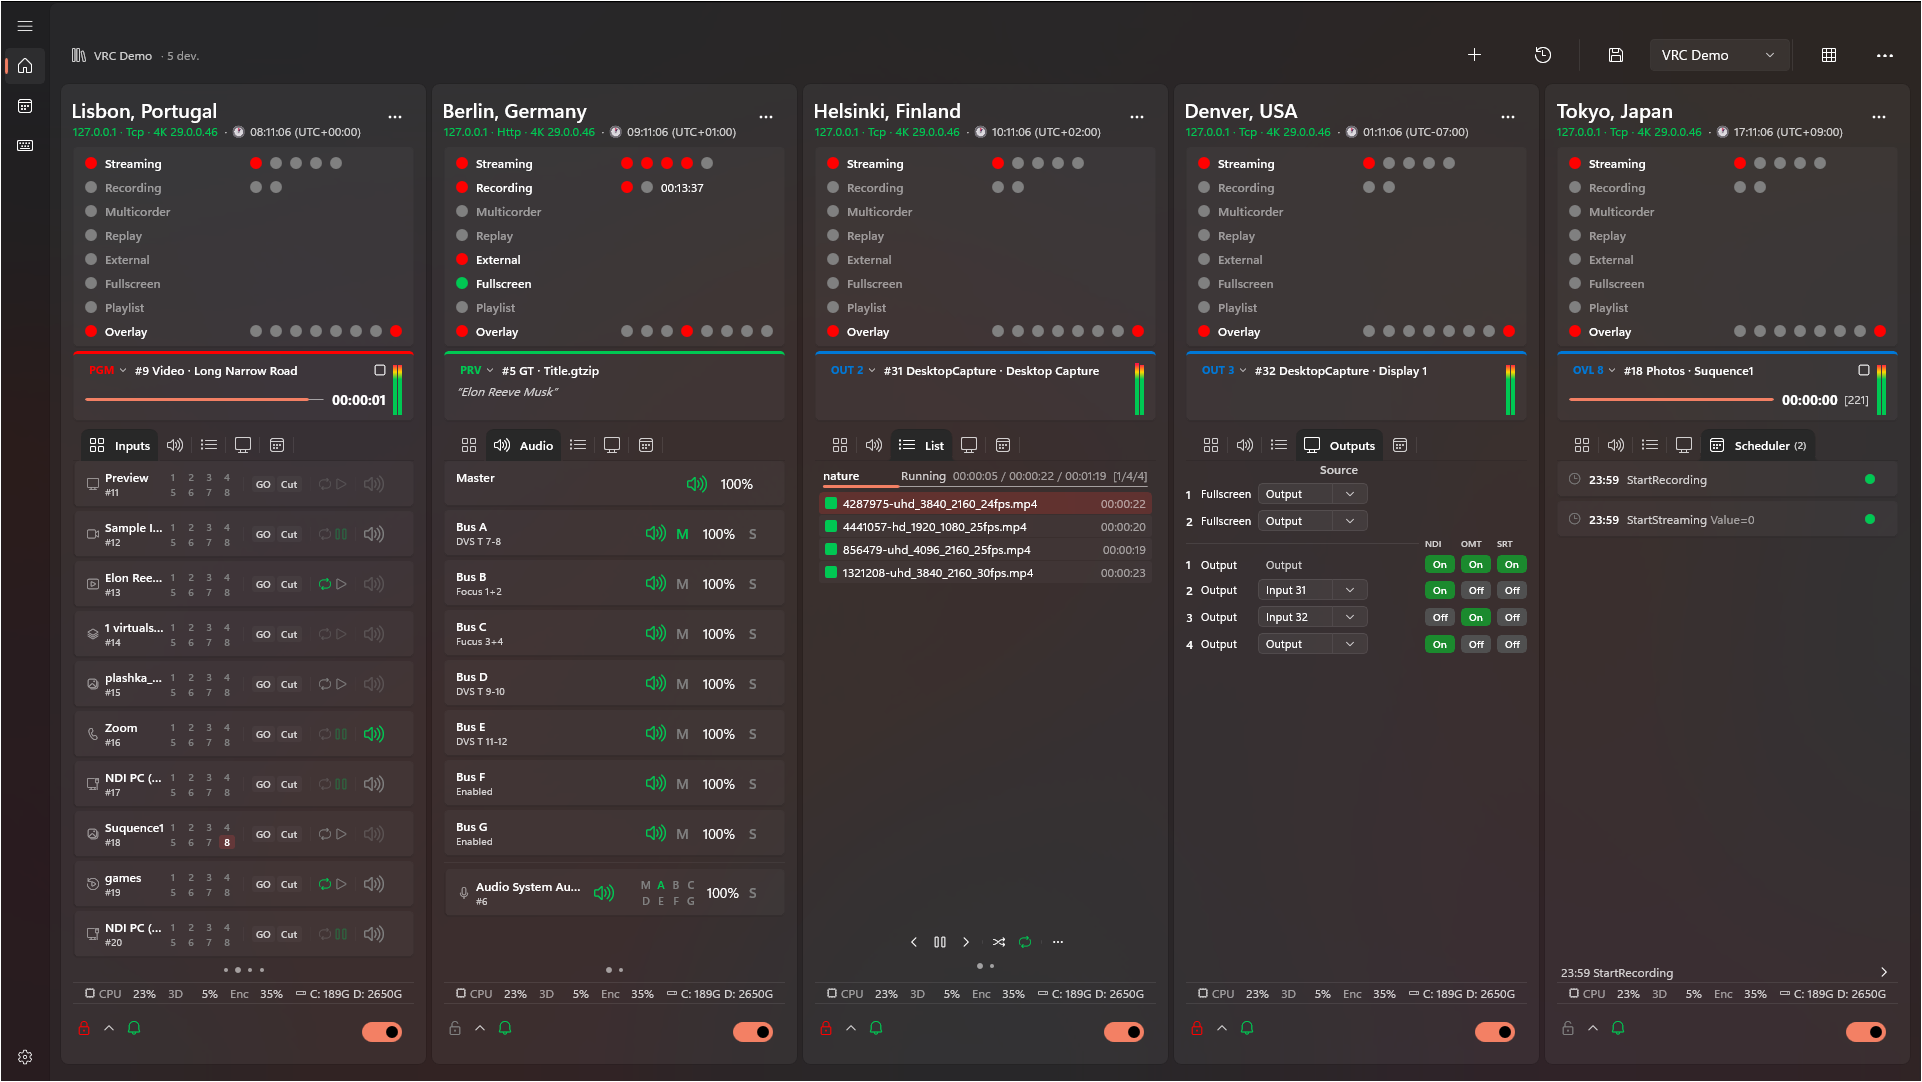 Command Bar Command Bar
- Add vMix (Ctrl+N): Opens the dialog to add a new vMix device
- Last Session: Load the last saved session
- Save Preset (Ctrl+S): Save current device configuration to the selected preset
- Card Size: Cycle through device card sizes
The status bar displays the current preset name and the number of connected devices. Additional Commands (overflow menu "⋯")
- Save As… (Ctrl+Shift+S): Save configuration under a new name
- Delete Preset: Delete the selected preset
- Export Preset: Export preset to a file for transfer or backup
- Import Preset: Import preset from a file
- Export Configuration: Export full application configuration
- Import Configuration: Import full application configuration
Card Display
- Device cards are arranged in an adaptive grid that automatically adjusts to the window size.
- Pagination — when there are many devices, cards are split across pages with a dot indicator for navigation. Mouse wheel scrolling is supported.
[hr] 2. vMix Device ManagementAdding a Device When adding a new vMix device, the following fields are specified:
- Name — custom name (up to 20 characters).
- IP Address — address of the machine running vMix.
- HTTP Port — vMix Web API port.
- TCP Port — TCP API port (configured automatically).
- Polling Interval — data refresh rate (250–5000 ms).
- Login and Password — credentials for authorization (if required).
- Transport Mode — communication method with vMix (HTTP, TCP, etc.). A warning about limitations is displayed when HTTP is selected.
- Time Zone — time zone assignment for the device to ensure correct time display during remote operation.
Connectivity Check (Probe)Before saving, you can test the connection to the device. The result and details are displayed directly in the dialog. Connection Options
- Auto-Connect — automatically connect to the device on application startup.
- Auto-Reconnect — automatically restore the connection when it is lost.
Device Actions (Card context menu)
- Streaming Settings — open the streaming channel management dialog.
- Edit — modify connection parameters.
- WMI Settings — configure remote PC monitoring.
- Logs — view the device event log.
- Delete — remove the device from the configuration.
- Move to… — move the device between groups.
[hr] 3. Device CardEach connected vMix device is displayed as a card with full real-time information. Below is a detailed description of all vMix control features available directly from the card. 3.1. Header
- Device name, IP address, transport mode.
- vMix version and edition, preset name.
- Device time zone.
- Color-coded connection status indicator.
- Context menu (⋯) — streaming settings, edit, WMI, logs, delete, move between groups.
3.2. Status Indicators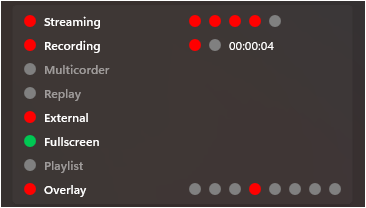 Interactive indicators — clicking toggles the corresponding vMix function:
- Streaming: Start/stop all channels (Individual indicators 1–5 are clickable).
- Recording: Start/stop recording (Primary/secondary indicators, duration timer).
- Multicorder: Start/stop multi-recording (if supported by edition).
- Replay: Start/stop Instant Replay recording (if supported by edition).
- External: Toggle external output on/off.
- Fullscreen: Toggle fullscreen mode on/off.
- Playlist: Start/stop playlist.
- Overlay: Disable all overlays (Individual indicators 1-8 are clickable).
3.3. Program Monitor Section displaying the current source in Program/Preview with audio levels. Monitor Source Selection:
- Program / Preview: Main or Preview output.
- PRV | PGM: Automatic — displays the active source.
- Output 1–4: External outputs.
- Overlay 1–8: Overlay layers.
Information Panel:
- Current input name — name and label of the playing source.
- Progress bar — for playable sources (video), showing remaining time.
- Playback status — Play / Pause / Stop icons.
- Loop — loop indicator.
- List position — element index display for video lists.
- Title text — current text for title inputs.
Master Audio Meter:
- Dual-channel (L/R) vertical Master bus level indicator.
- Gradient: green (normal) -> yellow (headroom) -> red (clipping). Tooltip with peak values (dBFS).
3.4. Inputs Tab — Input Control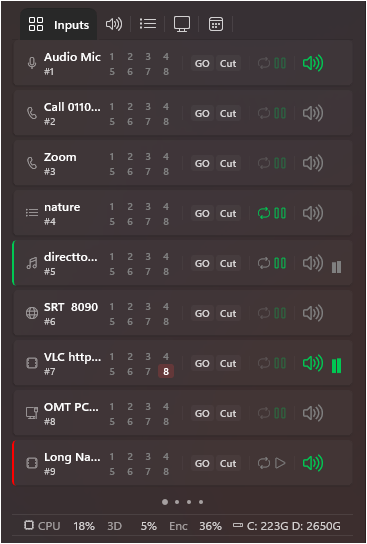 List of all vMix inputs with pagination. Primary actions (buttons):
- GO / QuickPlay: Transition to input.
- Cut: Instant switch to input.
- Play / Pause: For video inputs.
- Loop: Toggle playback looping.
- Mute: Mute / unmute input audio.
Input context menu (right-click):
- Active / Preview: Send input to Program or Preview.
- Restart: Restart playback (for video).
- AutoPause / AutoPlay / AutoRestart: Toggle automation features.
- Video Source (1–4) / Audio Source: Routing for Video Call inputs.
3.5. Audio Tab — Audio MixerFull-featured audio mixer with separate control of the master bus, buses, and inputs. Master Bus & Audio Buses (Bus A–G)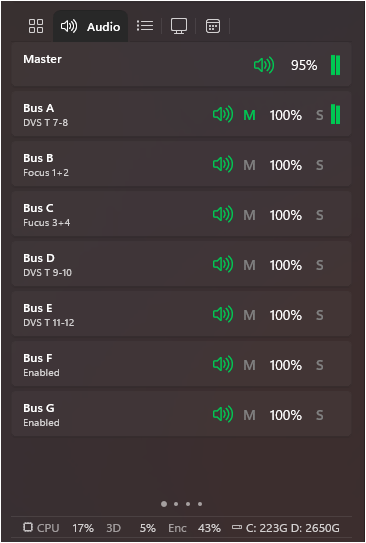
- Mute: Mute / unmute bus.
- Send to Master (M): Route bus to master.
- Volume slider: Bus level adjustment (0–100%).
- Solo (S): Solo-listen the bus.
Per-Input Audio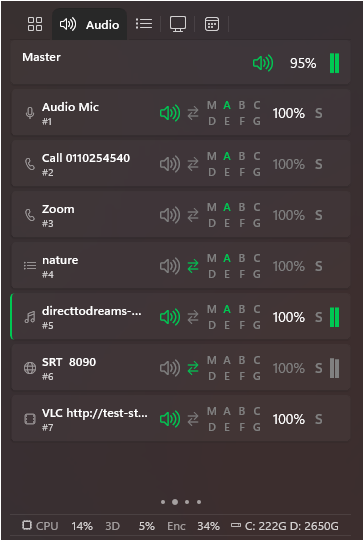
- Mute / Solo (S): Toggle states.
- AFV: Audio Follow Video toggle.
- Routing (M, A–G): Assign input to buses.
- Volume slider: Input level adjustment via popup fader.
3.6. List Tab — Video List Management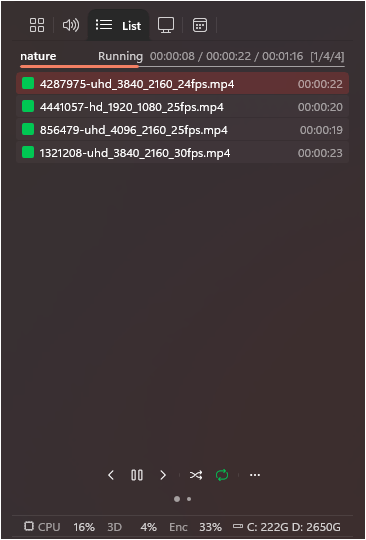
- Item List: Display of files with duration and color highlight for the playing item.
- Playback Controls: Previous, Play/Pause, Next, Shuffle, Loop.
- Additional Commands: Play Out, Auto Next, Auto First.
3.7. Outputs Tab — Output Control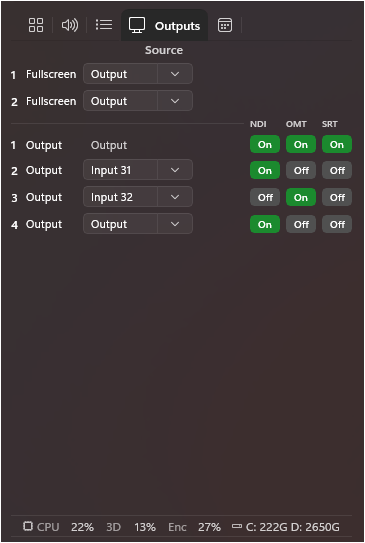
- Fullscreen 1 & 2: Source selection via SplitButton.
- External Outputs (1–4): Source assignment, NDI (On/Off), OMT (On/Off), SRT streaming status toggle.
3.9. Scheduler Tab — Device Schedule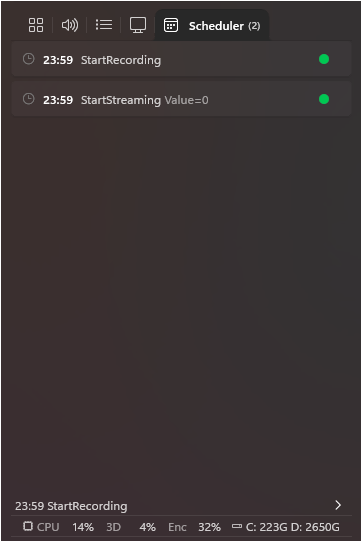 Compact list of scheduled tasks with time-until-next-task indicator. 3.10. Card Footer
- Lock: Protection against accidental actions.
- Collapse Audio: Show/hide the audio section.
- Notifications: Enable/disable notifications per device.
- Connection Toggle: Enable/disable connection.
[hr] 4. PC Health Monitoring Remote collection of workstation metrics via WMI:
- CPU — processor load.
- GPU 3D & GPU Encode — graphics card and hardware encoder load.
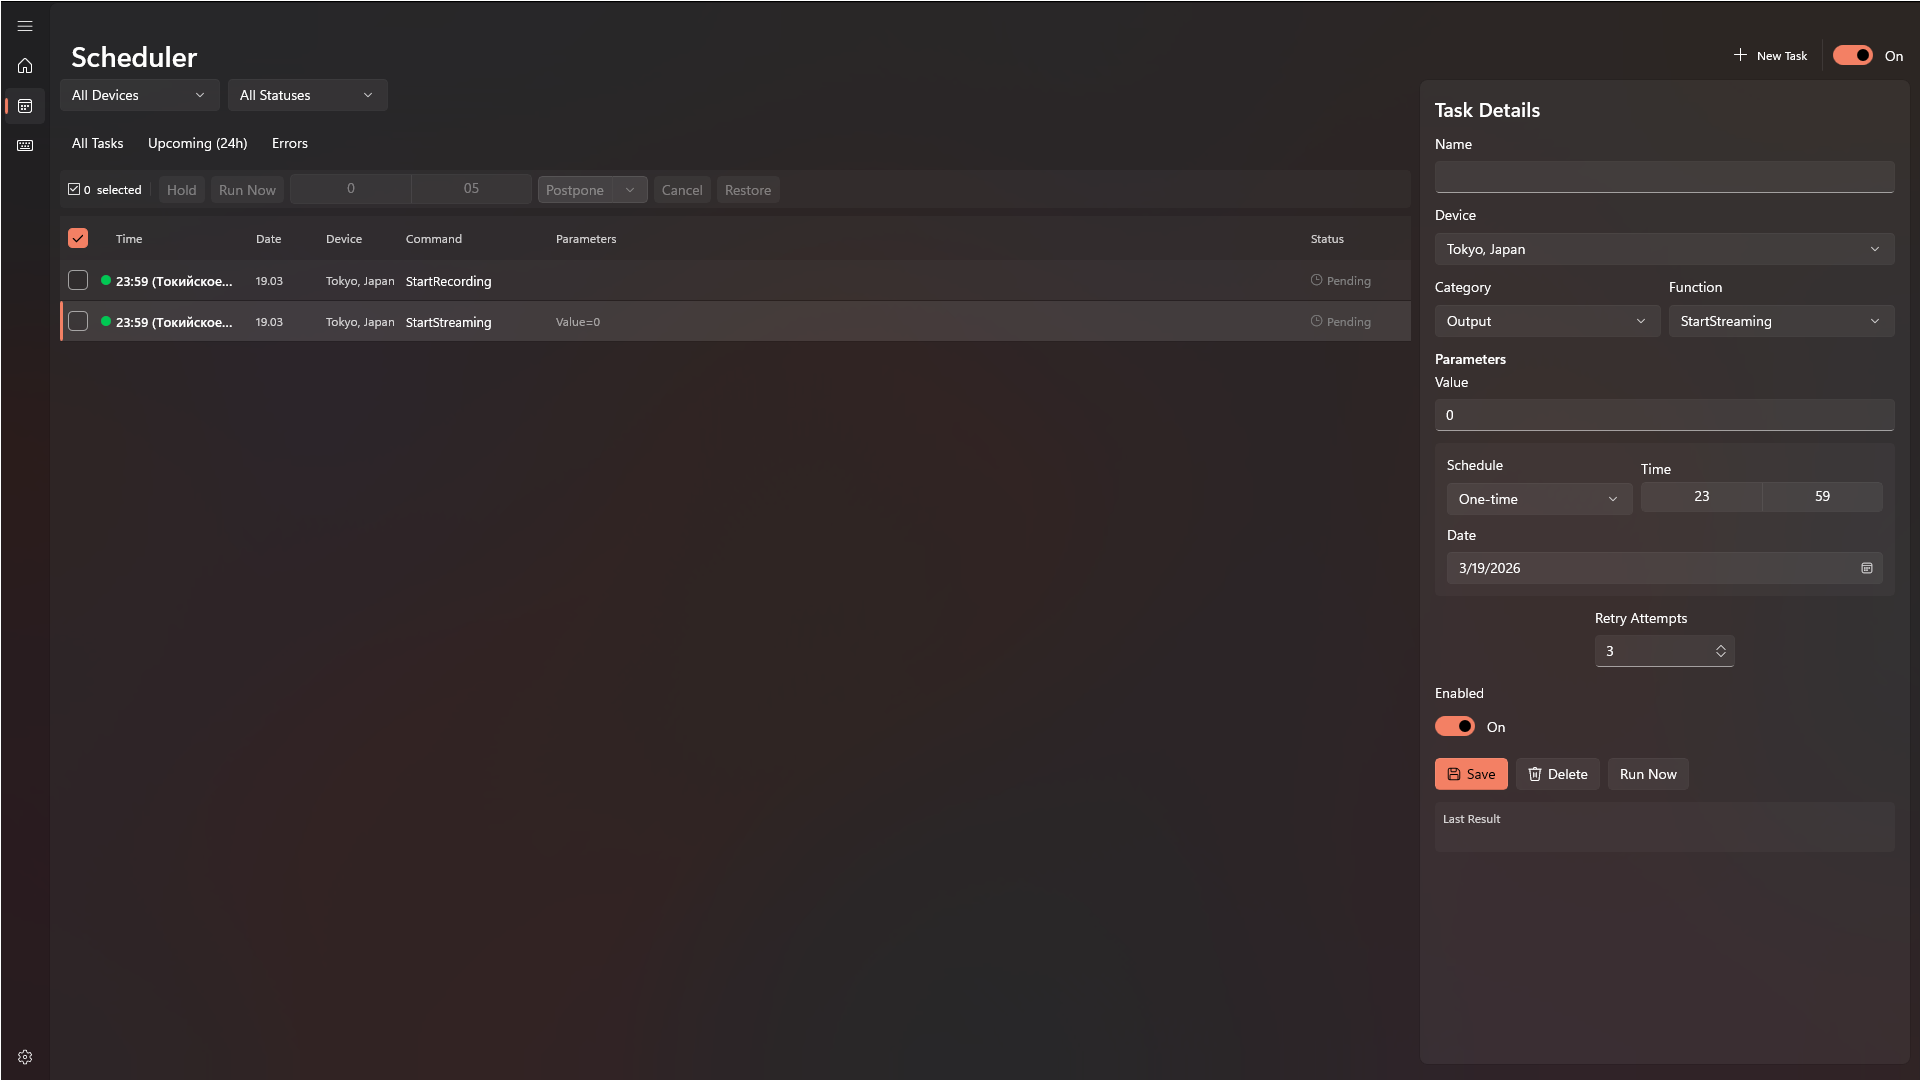
When remote monitoring is unavailable, WMI/RPC error information is displayed. 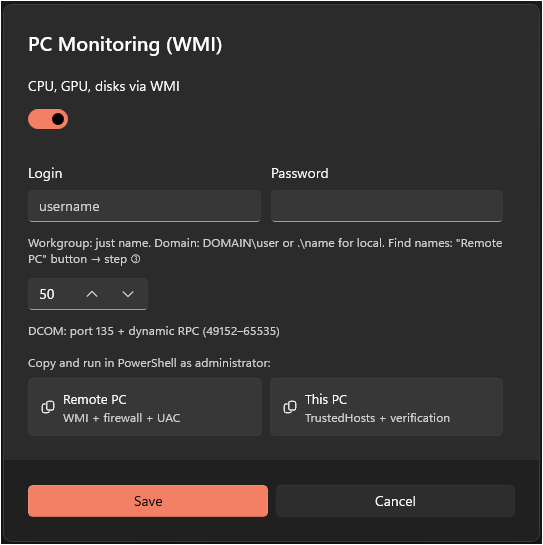 [hr] 5. Streaming Settings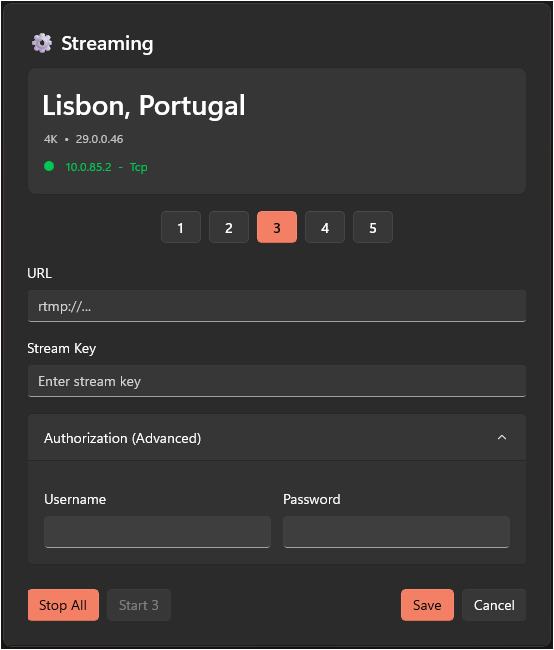 Dialog for managing streaming channels (Individual toggles 1-3), connection status, and IP info. [hr] 6. Task SchedulerCentralized management of deferred and recurring commands.
- Task Creation: Target device, Category, Function, Parameters, Schedule (one-time/daily/weekly), Retries.
- Bulk Actions: Hold, Run Now, Postpone (+5 / +10 / +15 min), Cancel, Restore.
 [hr] 7. Shortcuts (External Controller Integration)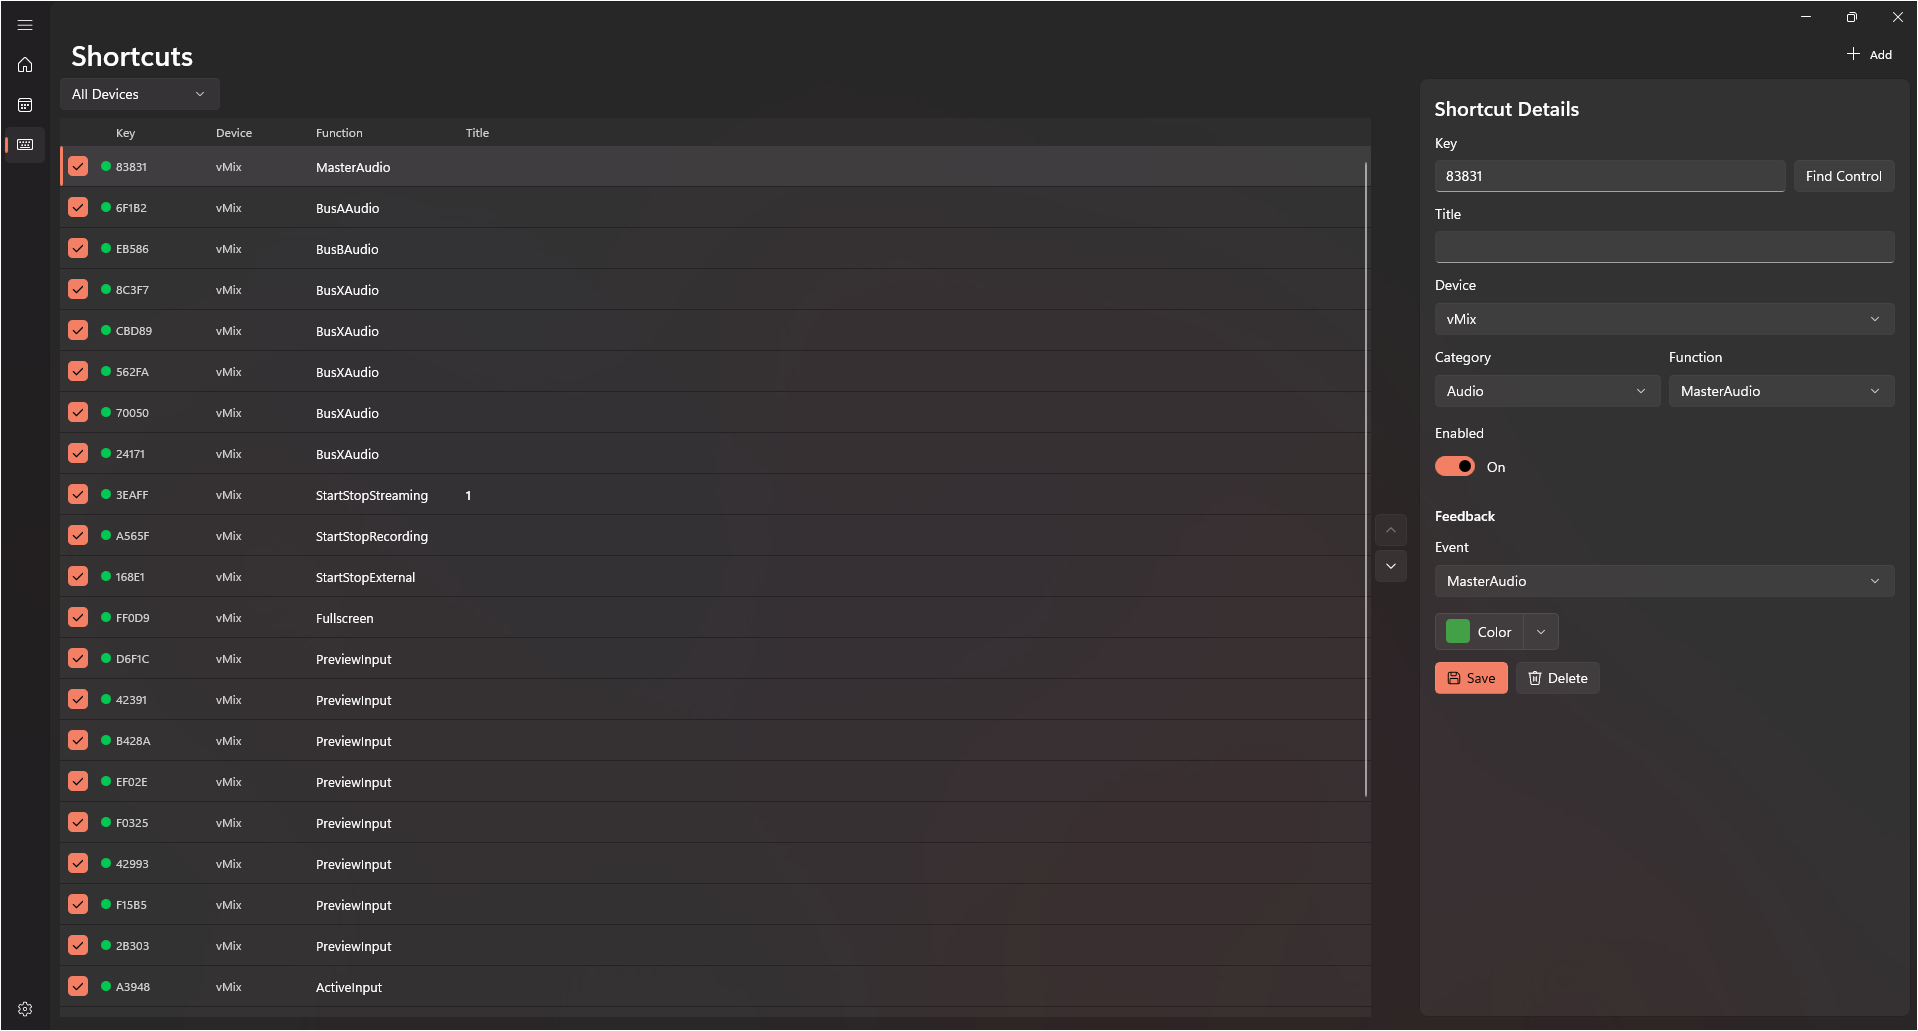 Binding external controller buttons (Stream Deck, Companion, Touch Portal, etc.) to VRC commands. All configuration is done entirely within VRC — the external device acts as a "thin client". How It Works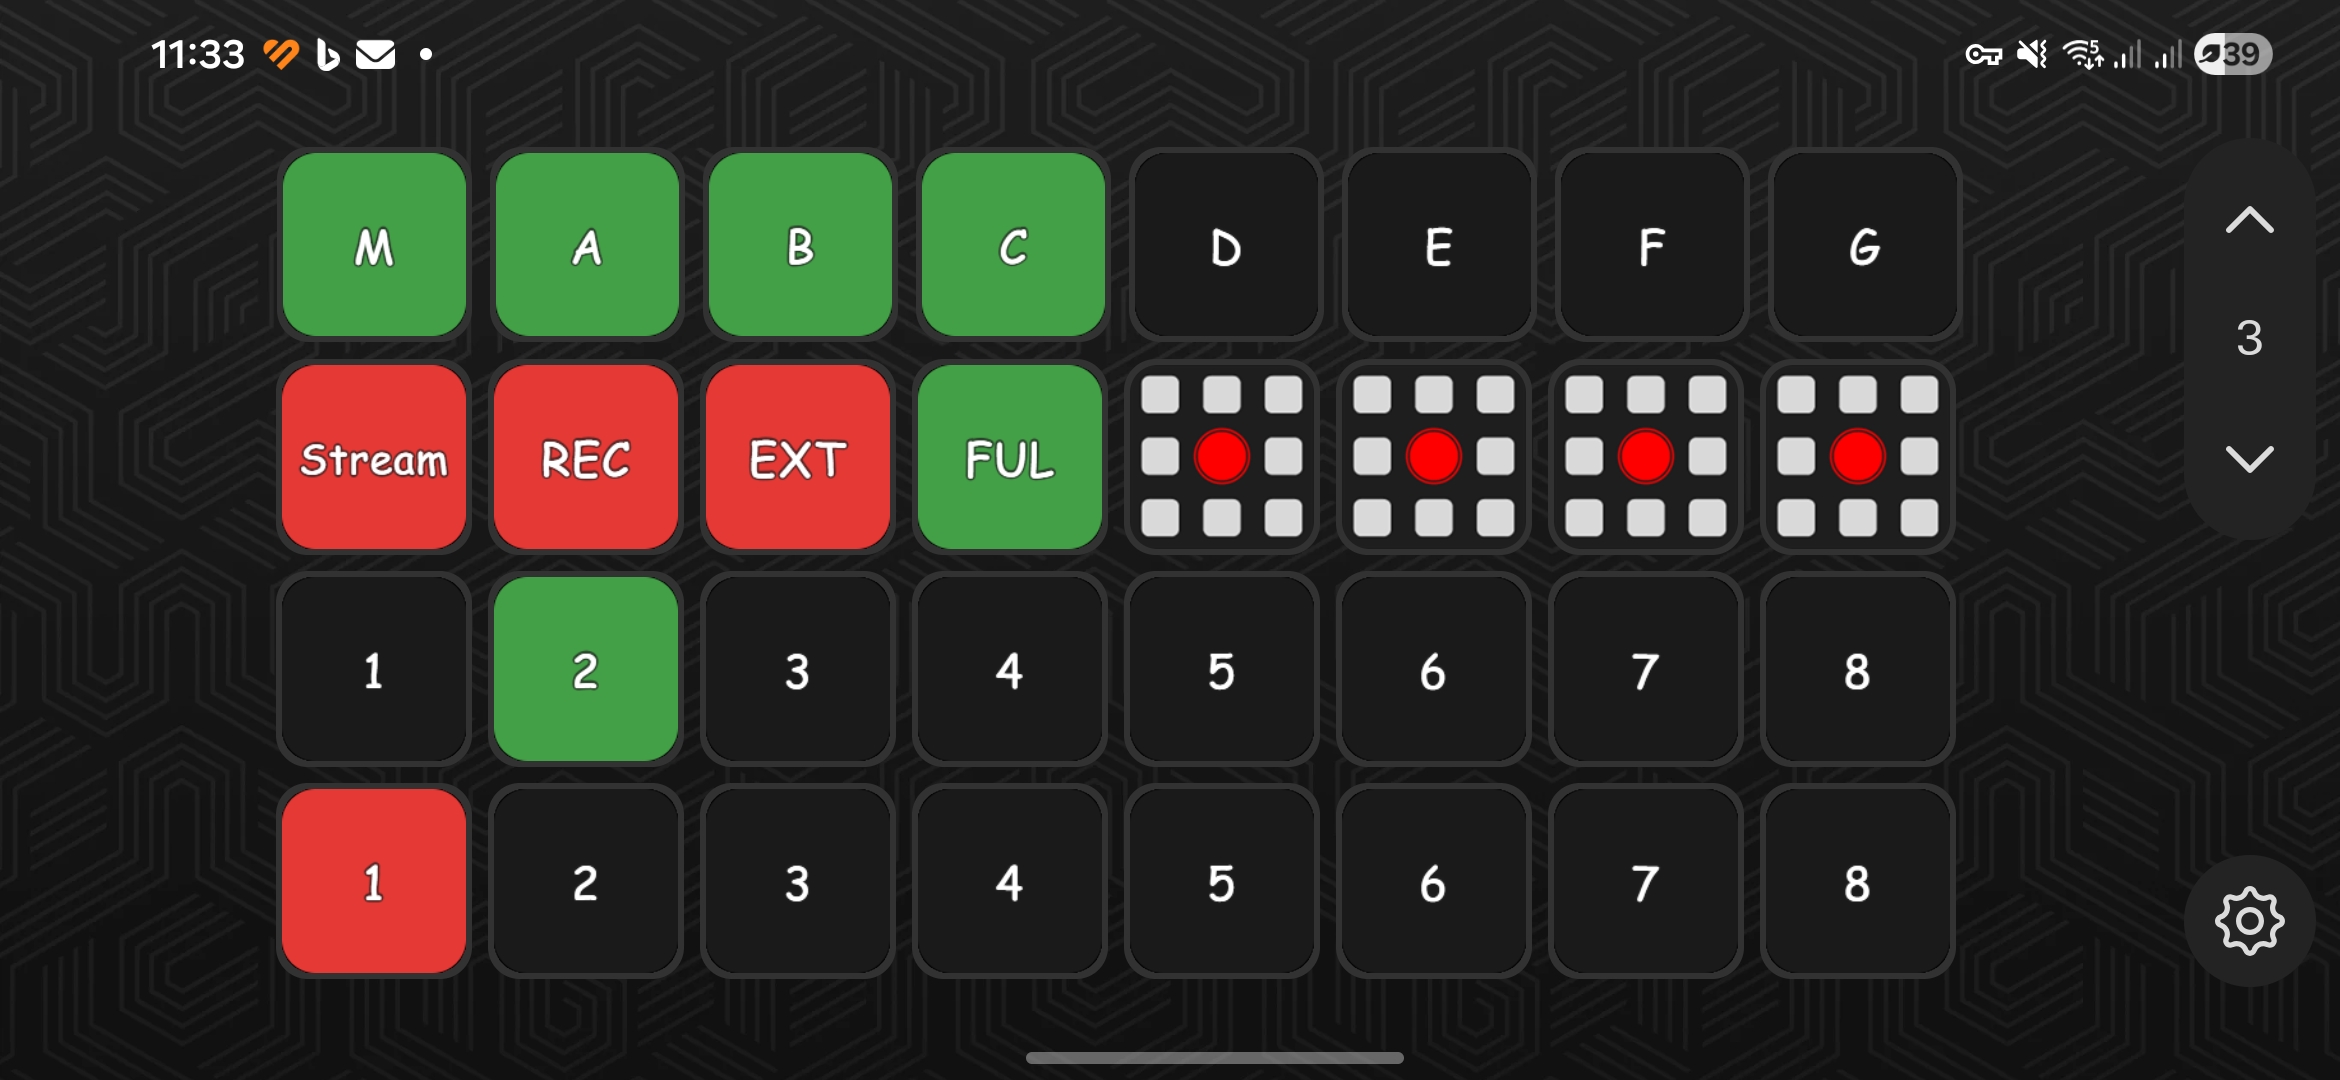 1. Drag "VRC Control" onto a Stream Deck button. 2. In VRC, open Shortcuts and click Add. 3. The Find Control dialog opens — press a physical button on the controller. 4. VRC captures the ID. Configure the command (Device -> Category -> Function -> Parameters).  Feedback Settings Feedback SettingsConfigures visual feedback (Smart Tally) sent back to the controller with zero delay.
- Event: ACTS event type (Recording, Streaming, InputAudio, Overlays, etc.)
- Color: Feedback color for the button when the event is active.
[hr] 8. Application Settings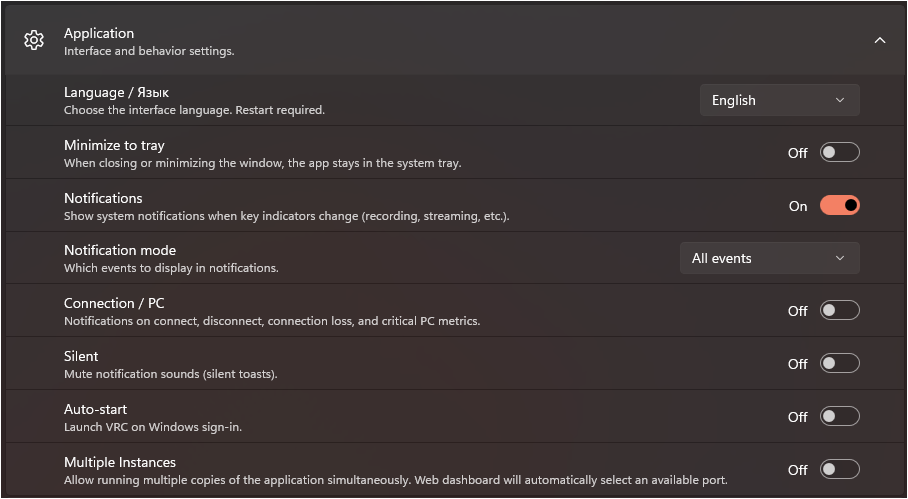
- General: Language, Minimize to Tray, Auto-Start.
- Notifications: Toast notifications mode, Connection alerts.
- Web Dashboard: Activate built-in web server, Port config.
- Logs and Diagnostics: Device logs folder, GC Monitor.
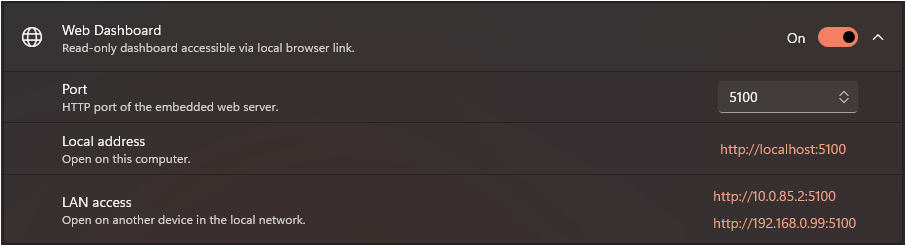 [hr] 9. Web Dashboard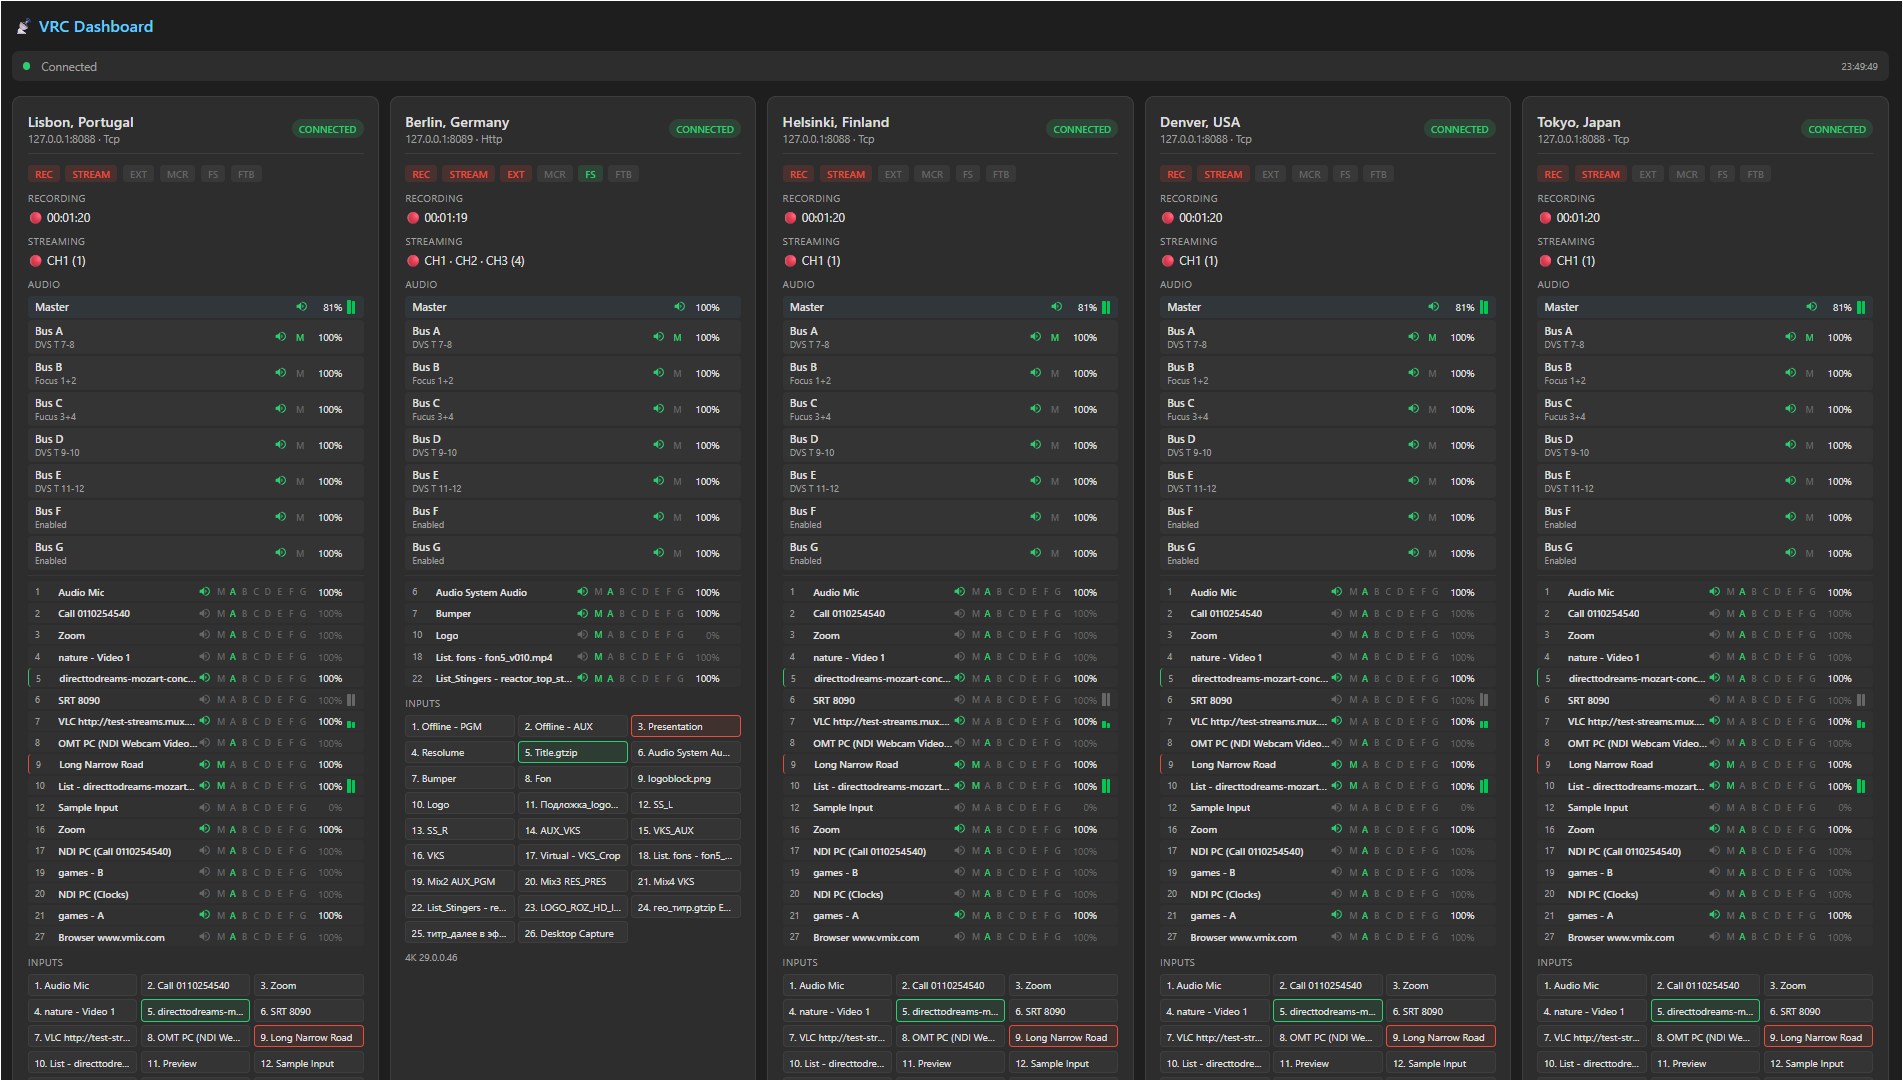 Built-in read-only dashboard accessible from any browser on the local network. Features Real-time updates via SignalR, displaying tally states (REC, STREAM, EXT, MCR, FS, FTB) and audio meters. [hr] Download and more details: https://github.com/Kotin-ak/VRC-Releases
|